- You have no items in your shopping cart
- Subtotal:
Artwork Setup Guide
:: Design Specs ::
:: Offset and Digital Artwork Specs ::
All flyers and print must have at least a 1/8″ bleed for offset (1/4″ bleed for business cards) and 1/4″ for digital jobs (cutting margin/ text away from edges). We are not responsible for proofing artwork that is sent to print and not designed by us. We try and proof all jobs when possible but all designers must adhere to our policies especially after the first few submissions. All files must also be sent in the appropriate format, CMYK. All files should be sent in jpegs unless otherwise stated and in the exact flyer size needed and at 300 dpi resolution. PDF’s must be outlined and all text flattend unless we specify otherwise, which may require a proof as documents tend to change. Our preferred method of submission is only jpegs to avoid any errors in the process.
:: Large Format Artwork Specs ::
All banners and displays must be sent in the size needed unless specified otherwise. Eg 24×72″ banner stand must be sent as 24×72″ in jpeg or pdf format with at least 150 dpi. Banner stands require a 3″ bleed (space with no text at the bottom as this is the part that rolls into the hardware)
For Photoshop users:To make a 1/8th” bleed you will need to use the ruler tool, if not activated go to the view menu and click on rulers. Then count 1/8th of an inch, which should be 8 dashes within the 1″ if viewed at 100%. To make sure your files are in the appropriate size click on image size from the top menu. If you are ordering 4″x6″ flyers within the image size box you should see 4 in width and 6 in height or vice versa. In this box you can also find the dpi settings which should be at 300. Please not that if you are using images that you found online or that are at poor resolution this will reflect within the print file. In other words you cannot take an image that is 72 dpi and 1″x1″ and make it 4″x4″ as it will become very distorted and blurred. If you view your design at 100%, click on view menu and then print size and you can see the clarity of your images. We will not be held responsible for submission in the wrong formats, wrong bleeds and sizes on jobs we did not design. If you are not familiar or sure if your files are correct we can review your files for an additional $6.25(G)and fix your files for an additional $18.75(G).
Here is a walk through video:
[embedyt] https://www.youtube.com/watch?v=yHGcuF2sj9c[/embedyt]
For Publisher users:To make a 1/8th” bleed you will need to use the ruler tool, if not activated go to the view menu and click on rulers. Then count 1/8th of an inch, which should be 8 dashes within the 1″ if viewed at 100%. To make sure your files are in the appropriate size click on page setup from the top file menu. If you are ordering 4″x6″ flyers within the image size box you should see 4 in width and 6 in height or vice versa. To set the proper resolution, you do this when you are saving your files. Click on save as from the top file menu, select jpeg from the drop down menu and then below this click change and select 300 dpi. Please not that if you are using images that you found online or that are at poor resolution this will reflect within the print file. In other words you cannot take an image that is 72 dpi and 1″x1″ and make it 4″x4″ as it will become very distorted and blurred. If you view your design at 100%, click on view menu and then print size and you can see the clarity of your images. When submitting your file please make sure mention that your file is designed in RGB, publisher is not a commercial printing software so it cannot save to CMYK format. We will not be held responsible for submission in the wrong formats, wrong bleeds, and sizes on jobs we did not design. If you are not familiar or sure if your files are correct we can review your files for an additional $6.25(G)and fix your files for an additional $18.75(G).
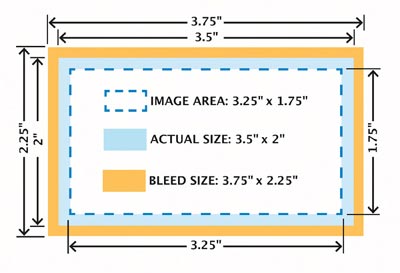
Note the above diagram the only way to achieve actual size is by giving an extra 1/4″ of bleed so we have room to trim.
When submitting 1/4″ bleed files send as the file size with 1/8th bleed on the outside of the final size and 1/8th on the inside.
ONLY JPEG or PDFs are accepted for paper printing unless specified otherwise! All fonts / effects must be outlined and flat in PDF or there will be errors in final product and we will not be responsible for files ripped improperly. JPEG is the safest way if you are not sure or flatten whole PDF FILE.
:: Spot UV Setup – Embossing Setup – Foil Stamping Setup – Full Color Foil Setup::
For spot uv, embossing or foil setup, we will need 4 files (each extra feature requires the extra file to layer the job for example if you do foil and spot uv 4/4 we will need an extra 4 files) or 2 if you are printing 4/0: Front print file, back print file, front uv mask and back uv mask. Do not send files as one pdf, send all individual files. To create the UV mask simply recolor any image or text that needs to be in uv to be black and delete everything else. Look at the below example, the small text was removed and all colors was deleted. This means that the UV will only be placed on the black areas. The mask file should only be black and white, flat colors! For foil stamping do not include your original layer in the print file as the foil stamp will not always 100% align properly. Always allow for a small margin of shifting in the stamping process, avoid designs that are close to objects that will obscure the results you are trying to achieve.
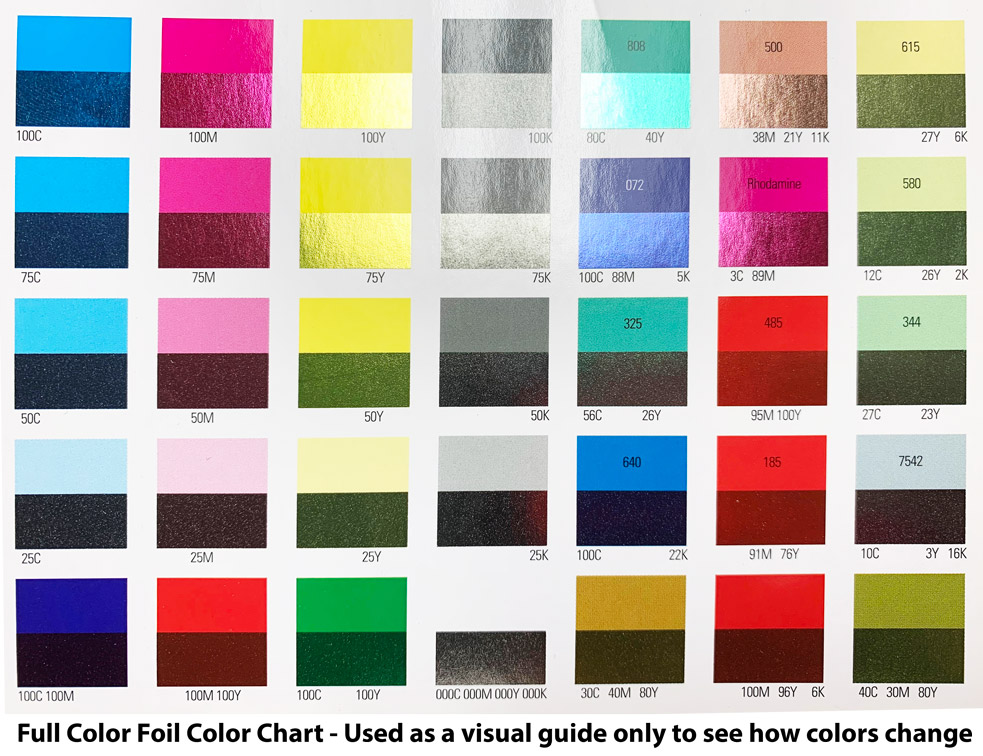
If you are designing for full color foil process the file must be designed the same as above but whatever colors you would like the foil to be must be in the print file. Based on the design below everything that overlaps the black mask will be full color foiled in 1000’s of metallic colors with gradients and not flat colors like hot foil stamping. Any color in your design that is white in the foil layer will be silver, anything yellow will be goldish etc.

::Die Cut Setup::
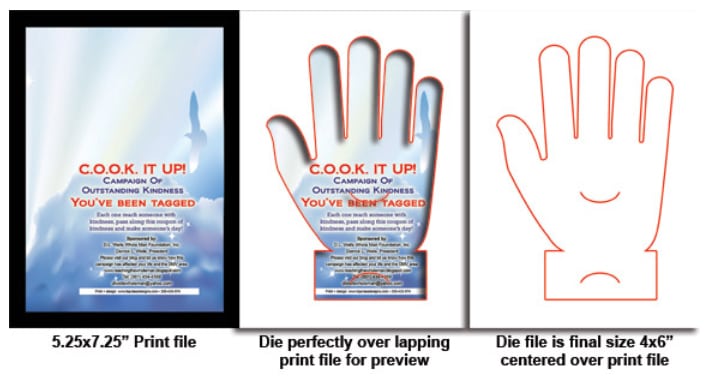
When creating die cut jobs there must be 1″ of gripping room from final size with a minimum size of 4×6″. For the above job print file is setup as 5×7 which would include bleed 5.25×7.25″, the final size of the job will be 4×6″. So you will center your 4×6 flyer and include bleed of at least .5″ extra for shifting purposes. Do not put text or create your design right on the edge of 4×6″ size as your design will shift between the cutting of the print file and die cutting. You will submit 3 files front and back of the print job which will be 1″ bigger than your final size and the die. Your die file be sent as an outline sent to size eg. 4×6″ which must be perfect centered in your print as this will be our reference point to know how to align your job. FYI do not design your die cuts with very tight margins to follow as shifting will occur, meaning make sure to give enough bleed for shifting. Do not include any elements in your print file that will need to be die cut. For example, a big circle in the middle of the print file that will be die cut, there is no need to include it and there will almost always be some shifting which will not give you the results you are looking for.
If you are sending a business card die cut your canvas size should be 4×6 and place your business card design in the center of the canvas.
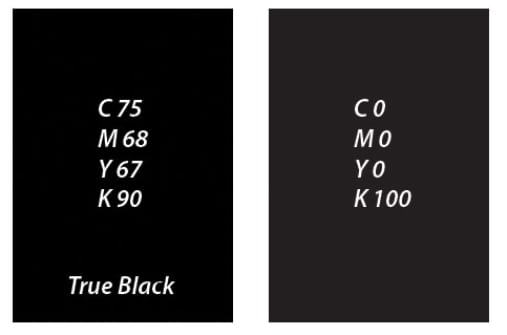
:: Rich black::
Believe it or not not all blacks are the same and setting your CMYK values to 100% black will not give you a good nice black. For the richest black please use these values below and if you look well you can see the difference.
When using a blue in your design, always make sure to leave at least a 30% difference in your Cyan and Magenta values.

Blue is close to purple in the CMYK spectrum. Remember, use a low amount of magenta whenever using high amounts of cyan to avoid purple.
Example: C-100 M-70 Y-0 k-0
:: RGB vs CMYK ::
If you send us an RGB file, there is a chance that a color shift may occur and you may not be satisfied with your job.

You should always start and finish your designs in CMYK
:: Apparel Artwork and Information::
Screen printing: Screen printing apparel artwork needs to be in vector AI or EPS, no Corel Draw files.
Embroidery: Embroidery apparel artwork can be in JPEG (but must be in high resolution), but vector format is preferred.
Screen Printing information: The maximum imprint area will be used unless otherwise specified. Set up is $28.75(G)per color and location. Screen printing maximum imprint color amount is up to 10 colors (minimum applies for 5 colors or more) and pending registration of artwork.
Embroidery information: Unless otherwise specify best location will be used for embroidery. Set up (digitizing) is $75.00(G)for 7,500 stitches; average logo is about 10cm wide with 7,500 stitches or less. Each additional 1,000 stitches are $0.50(G). Exact price cannot be known until files are digitized. Individual personalization is $5.00(G)per piece for initials and $7.50(G)per piece for full name.
:: Apparel Artwork Specs ::
All apparel artwork must be sent in vector format for screen printing. If not provided in vector format we can convert the files for $31.25 (G) for basic artwork conversion. Embroidery only a jpeg or pdf at decent resolution is needed.
:: Promotional Items Artwork Specs ::
Most promotional items are printed in a process called pad printing, which is similar to screen printing, unless noted as full color process job. Artwork must be sent in vector format (Adobe Illustrator or EPS), which is artwork separated by color. Each color will have its own separate screen. If you need any assistance with setting up your artwork please don’t hesitate to ask. If you need artwork converted let us know and we can do it for you, for a fee of $25.00(G)per artwork depending on complexity. JPEG is not an acceptable format. Rush is available for promotional items but time and fees may vary per item so contact us for details.